Introduction
ShinyLEGO is a Shiny application wrapped in the shinylego package that lets you create a simulated mosaic composed of LEGO bricks from any image file! Once your picture is uploaded, you can customize various settings for your mosaic such as dimensions, brightness, and color types. In addition, the application will generate specific instructions so that you can build the mosaic yourself! These instructions contain the brick colors and types required for each step, and a diagram showing how the bricks are to be assembled. You can also see an estimated cost associated with the mosaic if you wish to purchase the bricks yourself.
This application would not be possible without the innovative R scripts created by Ryan Timpe! Ryan has written excellent posts detailing the workflow this application draws upon, and the code for each post can be found on his LEGOMosaics GitHub repository:
- How To: LEGO mosaics from photos using R & the Tidyverse
- LEGO mosaics: Two weeks later
- LEGO mosaics: Part 3(D)
I have a lot more to say about the application below, so here are the key links if you want to start exploring now:
Links
- Live version: rpodcast.shinyapps.io/shinylego
- NOTE 3/14/19: If you upload an image file that has a large number of distinct colors, it is very likely that the app will crash due to running out of memory. My shinyapps.io plan can only deploy to servers with a max size of 1 GB. Please use either the RStudio Cloud project or install the app locally if you encounter this error.
- RStudio Cloud Project: rstudio.cloud/project/257906
- GitHub Repository: github.com/rpodcast/shinylego
Creating your mosaic
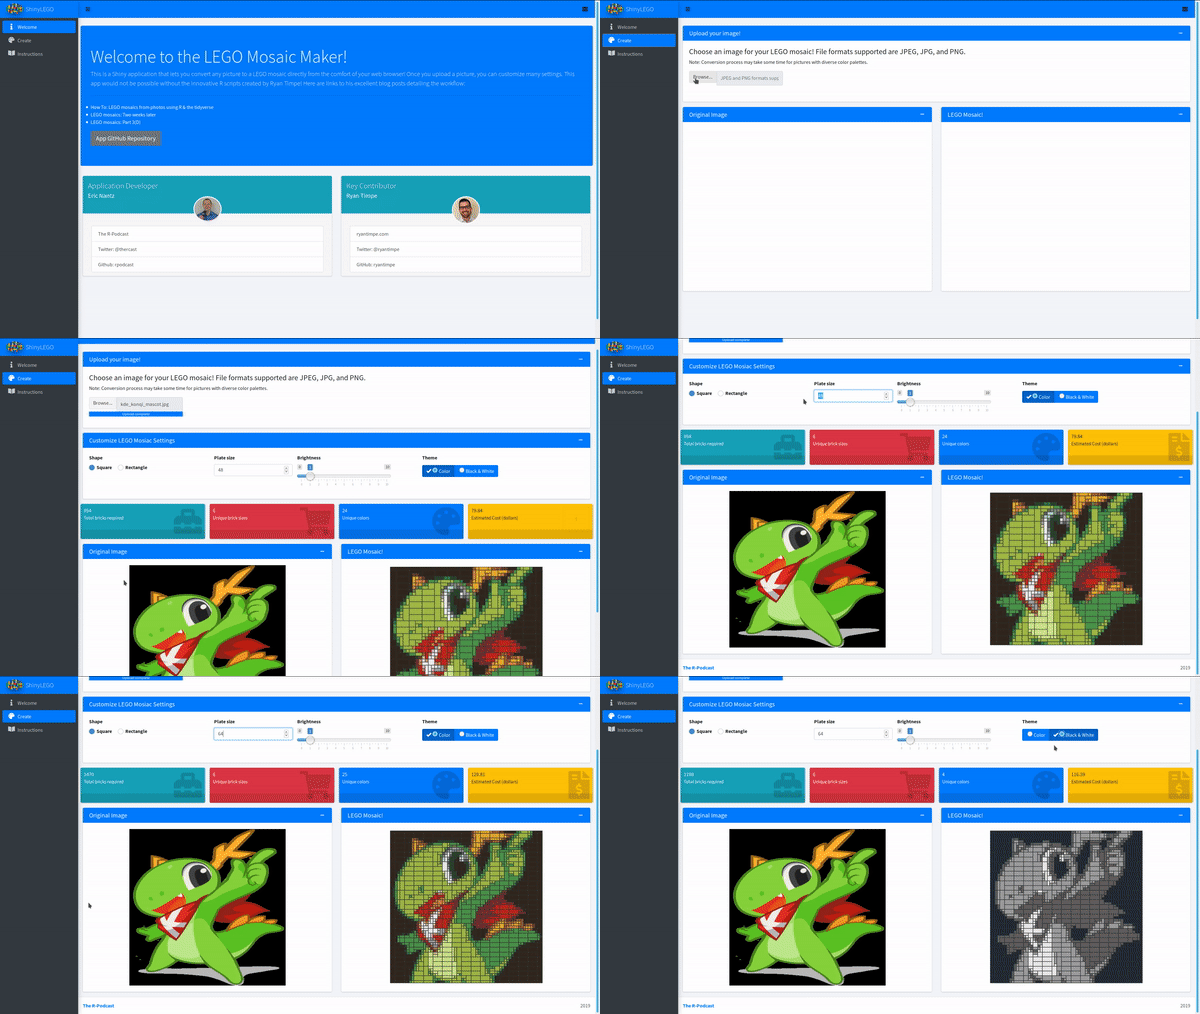
When you visit the app, you will be taken to the welcome page that gives a brief description of the app. Head to the Create tab to begin your mosaic creation! You can upload any image that is stored in png, jpg, or jpeg format. After some processing, you will see your original image and the new LEGO mosaic version side-by-side.

The mosaic can be customized by choosing different layouts, size (measured in "stubs"), overall brightness, and theme (color or black & white). As the settings are changed, a cool custom loading gif is rendered thanks to the awesome shinycustomloader package. You will also be presented some overall metrics pertaining to your mosaic and an estimated cost based on pricing data from the official LEGO online store. A custom
Creating build instructions
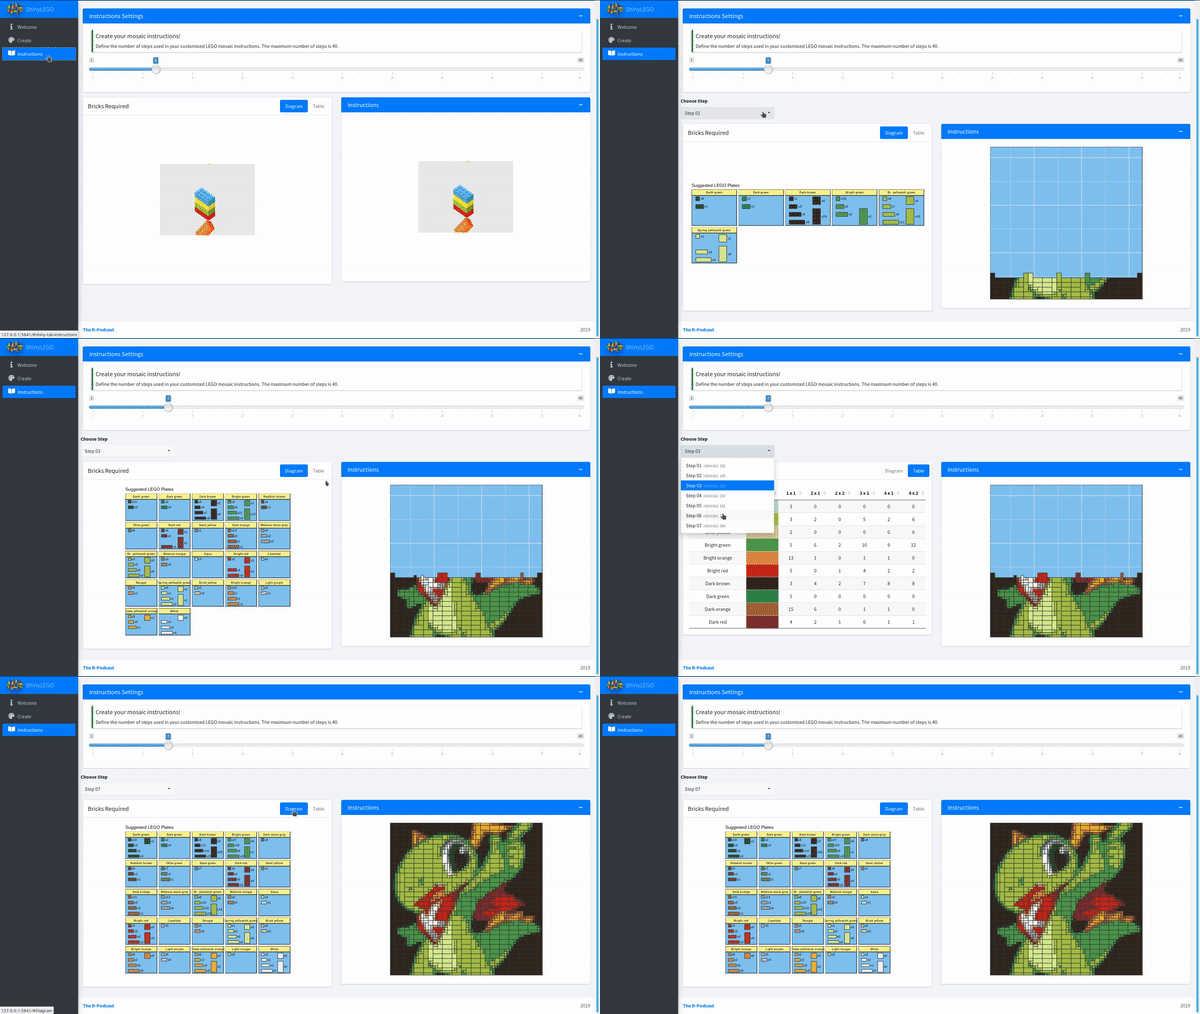
In the true spirit of LEGO sets, shinylego also lets you view a custom set of instructions you can use to actually build your mosaic! Visit the Instructions tab and you can choose the number of steps you want for your mosaic build instructions. After some brief processing, you can view the required LEGO pieces (both a diagram or table view are available) alongside a cumulative build of your mosaic image.

Technical Details
I have been building large shiny applications at the $day_job and this was my first attempt to apply many of the principles and ideas learned along the way to a fun project like this and explore some new ideas. I have never created a shiny application as a full R package before creating shinylego, but I was able to get the infrastructure created quickly and efficiently using the new golem package. I highly recommend using golem as it contains many useful utility functions to get standard shiny boilerplate initialized, with my personal favorite being the golem::add_module function to get a module template R script created instantly.
I wanted to build an app that had a distinct appearance, and the bs4Dash package is an excellent way to get a nice-looking dashboard with many nice visual elements. Many of the UI widgets in the app are powered by the excellent shinyWidgets package, and it seems like I discover a new widget every time I use it. One such widget is the shinyWidgets::pickerInput that lets you add a supplemental text next to the input choices, as seen in the steps chooser.
Another useful package I had not used before this app was shinycustomloader, which lets me avoid the "greyed-out" loading status and replace it with a custom animated gif. I think the one I found is quite appropriate!
What about 3-D?
If you have been following Ryan's progress and recent tweets, you have seen the supremely awesome integration of rayshader to create 3-dimensional mosaics! It is on my roadmap to figure out how to incorporate rayshader visualizations in a Shiny application. I have tried using some of the new enhancements in the rgl package that let you add interactive RGL-made visualizations in Shiny, but I hit an out-of-memory error on shinyapps.io when trying to add a 3-D mosaic render. I'm hopeful that I can find a solution in the near future!
Acknowledgements
In addition to Ryan’s excellent R programs detailed above, this application utilizes many powerful packages in the shiny ecosystem such as the following:
shinyjs: Easily improve the user experience of your Shiny apps in seconds by Dean Attalibs4Dash: Bootstrap 4 shinydashboard using AdminLTE3 by David Granjob (part of the RinteRface initiative)shinyWidgets: Extend widgets available in Shiny by Victor Perrier (part of the dreamRs
organization)shinycustomloader: Add a custom loader for R shiny by Emi TanakaDT: R Interface to the jQuery Plug-in DataTables by Yihui Xiegolem: A framework for building robust Shiny Apps by Vincent Guyader and Colin Fay (part of the R Task Force at ThinkR)