Hi -
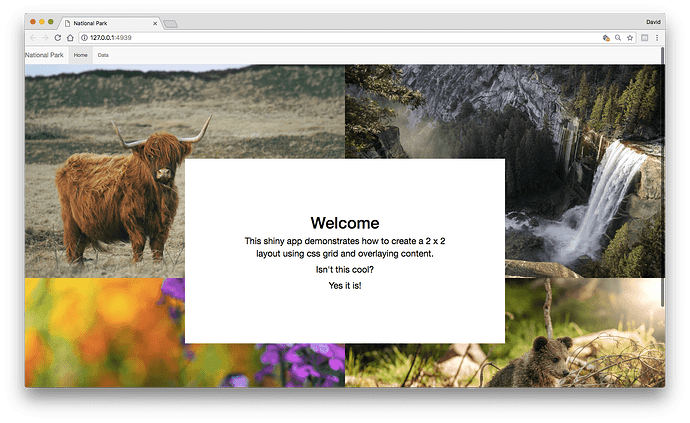
CSS Grid and flexbox are your best friends for a 2 x2 layout with content placed on top. In terms of the structure, wrap two div elements (children) in a parent div (for demonstration, I've assigned classes. You may want to use a naming system that makes sense for you). One child element will have all of the background images and the other has the content. In shiny language, it would look like this:
...
	# parent
	tags$div(class="landing-wrapper",

		# child: images
		tags$div(class="landing-block background-content",
			...images go here..
		),

		# child: content (that will be placed on top of the images)
		tags$div(class="landing-block foreground-content",
			...content goes here...
		)
	)
...
The second child would have the following css properties and values assign: position:absolute, top: 0 (or some other value depending on your preference), z-index:9999. This will allow for the content to be placed over the images.
For aligning the images in a 2 x 2 layout using css grid with content placed on top, take a look at the following css grid properties: grid-template-columns, grid-row-gap, and grid-column-gap (see links below for more information; there are also many other properties that will be helpful too).
Using the example provided and adding in some css here's what it looks like.
It's easier to manage css in another file. In this example might be easier to create a file and store it in the www/ directory and read it in using
tags$head(tags$link(type="text/css", rel="stylesheet", href="path/to/css/file.css"))
The drawbacks of using this approach inside a bootstrap layouts is that some degree of overriding bootstrap styling is needed. I managed to get all of the white space eliminated, but ended up messing up the layout of the navigation bar.
Something you might want to consider is using this as a landing page written as is and placing it outside the navbarPage, and then hidding all of the other content using the shinyjs packge. Place a "get started" button in the center, which will lead the user to the first tab (data in this case). This might come in handy if you are loading many assets, large data files, and running many scripts at startup.
I've also placed this project on github. You can find the link at the bottom of this post.
Let me know if you have any questions.
Shiny app
# set image urls -- for ease, I'm calling them here
top_left <- "https://images.unsplash.com/photo-1495834041987-92052c2f2865?ixlib=rb-0.3.5&ixid=eyJhcHBfaWQiOjEyMDd9&s=3d771d2cc226047515072dba7a5f03bc&auto=format&fit=crop&w=1050&q=80"
top_right <- "https://images.unsplash.com/photo-1494088391210-792bbadb00f4?ixlib=rb-0.3.5&ixid=eyJhcHBfaWQiOjEyMDd9&s=a421613e91c8475243ad4630171f4374&auto=format&fit=crop&w=1050&q=80"
bottom_left <- "https://images.unsplash.com/photo-1526411061437-7a7d51ec44c8?ixlib=rb-0.3.5&ixid=eyJhcHBfaWQiOjEyMDd9&s=e507916666b43919185fb16cf4e71813&auto=format&fit=crop&w=1050&q=80"

bottom_right <- "https://images.unsplash.com/photo-1525869916826-972885c91c1e?ixlib=rb-0.3.5&ixid=eyJhcHBfaWQiOjEyMDd9&s=f7cce16b11befb3dc6ed56074727b7b6&auto=format&fit=crop&w=1050&q=80"


# pkgs
library(shiny)

# ui
ui <- tagList(

    #'////////////////////////////////////////
    # head + css
    tags$head(
        tags$link(href="app.css", rel="stylesheet", type="text/css")
    ),

    #'////////////////////////////////////////
    # UI
    shinyUI(

        # layout
        navbarPage(title = 'National Park',


                   # tab 1: landing page
                   tabPanel(title = "Home",

                            # parent container
                            tags$div(class="landing-wrapper",

                                     # child element 1: images
                                     tags$div(class="landing-block background-content",

                                              # top left
                                              img(src=top_left),

                                              # top right
                                              img(src=top_right),

                                              # bottom left
                                              img(src=bottom_left),

                                              # bottom right

                                              img(src=bottom_right)

                                     ),

                                     # child element 2: content
                                     tags$div(class="landing-block foreground-content",
                                              tags$div(class="foreground-text",
                                                       tags$h1("Welcome"),
                                                       tags$p("This shiny app demonstrates
                                                     how to create a 2 x 2 layout
                                                              using css grid and
                                                              overlaying content."),
                                                       tags$p("Isn't this cool?"),
                                                       tags$p("Yes it is!")
                                              )
                                     )
                            )
                   ),

                   #'////////////////////////////////////////
                   # tab 2: data
                   tabPanel(title = "Data")
        )
    )
)


# server
server <- shinyServer(function(input, output){

})


# app
shinyApp(ui, server)
CSS
html,body{
    width: 100%;
    padding: 0;
    margin: 0;
}

/* overriding bootstrap */
.container-fluid,
.navbar{
    width: 100%;
    padding: 0 !important;
    margin:0 !important;
}

/* layout css */
.landing-wrapper {}


.landing-wrapper .landing-block{
    width: 100%;
    height: 100vh;
}

.landing-wrapper .background-content{
    display: grid;
    grid-template-columns: 50% 50%;
    grid-row-gap: 0;
    grid-row-columns: 0;
}

.landing-wrapper .background-content img{
    display: block;
    width: 100%;
}

.landing-wrapper .foreground-content{
    position: absolute;
    top: 10%;
    z-index: 9999;
    display: flex;
    justify-content: center;
    align-items: center;
}

.landing-wrapper .foreground-content .foreground-text{
    width: 50%;
    padding: 7.5%;
    color: black;
    background-color: white;
    text-align: center;
}

.landing-wrapper .foreground-content .foreground-text h1{font-size: 4.5rem;}
.landing-wrapper .foreground-content .foreground-text p{font-size: 2.5rem;}
Further Reading
CSS GRID
Flexbox
Github Link
- github: landing page demo
